- Supplies and Tools #1
- Supplies and Tools #2
- Primer and Brushes
- Paint
- Pastels, Sealers & Xtra Tips
|
Glues:
Garage Kits are made using a 2-part polyurethane resin; this is different than those styrene plastic kits you may remember from when we were kids. These different materials require that we use different glues. Two types can and should be used: 2-part Epoxy glue that you can find in most any hardware store or Cyanoacrylate (CA) glue that is readily available in all hobby shops. CA glue is the preferred type mainly due to the fact that you can use “Kicker” to speed up the curing process. Apply a small amount of CA glue to the mating parts (remember a little goes a long way here), join the parts together, and then give them a spritz with the Kicker. This will start a chemical reaction that will generate heat and instantly bond both parts together in seconds. These type glues are best suited for resin and vinyl model kits and CAN be used on styrene, but be forewarned that if you use this type of glue on styrene kits along with the Kicker, it will virtually melt/weld both parts together and need adding sanding done. Using 2-part Epoxy glues of the 5- and 10-minute setting variety gives added strength to the bonded parts, but you must hold both parts in place until the glue cures. There is no known Kicker for this type of glue. 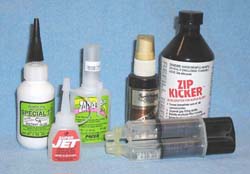 Tip:
In the event that you’re using CA glue and happen to run out of Kicker during one of those late-night modeling sessions, never fear! Just sprinkle some baking soda on the area that you glued. This will work similar to using Kicker, but it will take longer for the “entire” glued area to set up.
Modeling Knives:
Hobby knives, often called by the brand name “X-Acto” by veterans in the hobby trade, come in three sizes and with more different types of blades than you can possibly imagine. X-Acto knives are used to scrape away seams; trim excess vinyl and resin “flash” off of parts, reshape parts, and remove excess material to make parts fit more securely. The most common size blade is the #11, which is sold in bulk packs for a lesser cost, but as you become more familiar with handling the knife and the different blades that they make. 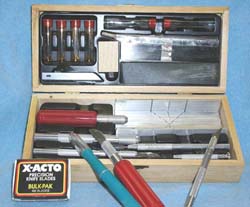
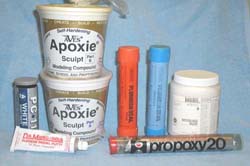
Putties:
There are basically two different types of putty that modelers use, a tube or paste type or a 2-part Epoxy type. Both are useful and deserve a space in a modeler’s bag of tricks. Tube types like Squadron White or Green, 3M, and Dr Micro tools are the most common paste types used by modelers today. Some opt for Bondo type 2-part paste, and then some (like me) prefer Liquitex Modeling Paste. These paste type putties are used for filling in minor defects like pinholes, cracks, or small air bubbles. They really are just about the only way to go with filling areas with a lot of pinholes. Just brush it onto the area, smooth it out with a wet finger or damp brush in detail areas, and then lightly sand when the area is dry.
2-Part Epoxy putties are the workhorse of the modeler. I tried everything from plumber’s Epoxy to automobile grade before I finally found the one that, in my humble opinion, is the Rolls Royce of 2-part putties. Some swear by Magic Sculpt, but for me Apoxie Sculpt by AVES is the way to go. 2-Part Epoxy putties are used to fill gaps in the areas where parts meet, bigger defects on kits like offset seam lines, and larger air-bubbles. They are also used to resculpt small broken or missing parts like fingers or noses or small detail pieces.
2-Part putties are VERY easy to use.
They come in two separate containers.
Just use equal amounts of both parts, and mix them together with your fingers until you get a uniform color.
Work the putty into the area that needs it, and smooth with a wet finger.
If the area that you’re working on has detail that needs to be resulpted, just wait about 10-15 minutes and the putty should be the right consistency for detail work.
Sand as you would regular resin parts.
 Tip:
Working on something that needs a glass smooth finish, but you have used 2-part putty for repairs in that area? Get some Vicks VapoRub, dab a bit on your finger, and smooth the puttied area with it. After that, just do some wet sanding, and you’ll be good to go!
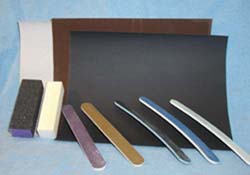
Sandpapers/Files:
These are “must haves” in any modeler’s arsenal. Resin kits, for the most part, are made of numerous parts, and each one of those parts comes out of a 2-part mold. This results in a seam line of some sort. To cure these defects, which are common, you’ll need to sand them away. Also, after puttying any pinholes or gaps, you’ll need to smooth that area and remove any excess putty that may remain. Probably the cheapest and most readily available tool that you can find just about anywhere is regular, everyday sandpaper. I myself have pretty much stopped using sandpaper in favor of sanding blocks and the files that they sell in the women’s nail section of cosmetic stores. The blocks are easier to handle; they are 4-sided and work great on contoured areas like arms or legs. They’re easy to handle and store, and I can cut or shape them into any configuration to fit what I’m working on. Whenever you’re working with sandpaper, work from a coarser grit down to the smoothest for the desired finish you’re going for.
 Tip:
Whenever sanding resin, it’s a good idea to wear eye protection and a breathing mask. These are readily found in hardware stores.
|