- Supplies and Tools #1
- Supplies and Tools #2
- Primer and Brushes
- Paint
- Pastels, Sealers & Xtra Tips
|
Primer:
The primer that you MUST use on Garage Kits, be it vinyl or resin, is a lacquer based sandable type. Primer has a two-fold use with Garage Kits. First off, the resin used to make Garage Kits does not let paint adhere to it well. If you were to paint straight onto the kit, more than likely the paint will flake off with only minor handling. Spraying primer onto the kit will give the paint something to “bite” and adhere to, making it less prone to flaking off. Secondly, after you have your kit all built and cleaned, priming the kit will bring out any small defects that you may have missed and allow you to correct them before painting, leaving you with a perfect build-up.
There are a number of different brands of primer out there to choose from: Plasticote auto primer, Armory, FloQuil, and Mr. Surfacer from Japan. My favorite is good old Krylon brand. It’s inexpensive, comes in five different colors (which is actually pretty important depending on what you’re painting), and is available just about everywhere. I prefer the white when I am painting a lot of flesh or going to use transparent paints, black for kits that I will be doing a lot of dry-brushing (don’t worry we’ll go over the techniques at a later date), the rust color for ground bases or kits that will use a lot of earth tones, and the light and dark gray ones for general kit work.
To prime your kit, follow the directions on the can. Mist the primer onto the kit from about 12 inches away to get a smooth, even coat all over. Let the primer cure for 24 hours, and you’re all set. 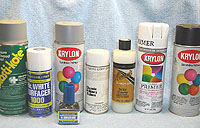
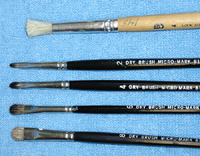
Brushes:
You will need at least three “rounds” and thee “flats” in various sizes. For the flats I like the Loew-Cornell 797-F Flat stain brush in the 4, 2, and 1 size. You’ll find other comparable brushes, but the size and width of the bristles on the brush is what I’m trying to show here. For the rounds I tend to stick with smaller sizes since I primarily use them for detail work. The largest size round I use is a 2, but I go all the way down to a 10/0 for some of the serious detail work. Find the ones that YOU are comfortable with, and don’t be afraid to experiment.
All brushes are made with either synthetic or natural fibers. I have both kinds, and each has their place. It’ll be up to you to find which ones fit your needs.
 
Speciality Brushes:
As with all tools, it takes a certain type to do a certain job. The same holds true for painting kits.
Stippling Brush:
This is used to create textured effects on stone, groundwork, bricks, and various base related items. I wouldn’t go crazy buying up a bunch of these. I have one, and that’s all I’ve ever needed for everything in that regard.Angle Brushes:
These are basically flats that are cut on the bias. I know some guys who prefer these to flats. I have a few, and at times the angled edge makes it easier to get into recessed detail that I can’t get at using a flat. But that’s the exception, not the rule.
Dry Brush Brushes:
A hobby related company by the name of Micro Mark came out with a set of Dry Brush Brushes in four different sizes about four or five years ago. As you will find out later, dry brushing is a technique where you remove most of the paint from your brush and gently paint onto the highest points of your kit for texture/highlights or to show wear on clothing. I’d be a bold faced liar if I didn’t say that I LOVE these brushes! Granted, they’re a specialty brush, but they are just about foolproof for dry brushing and applying pastels on your kits. The set costs about $24.00, but I NEVER have less than three sets at home at all times. If I were to hear that they are being discontinued, I’d buy up every one they have in stock and never look back. They’re that damn good!
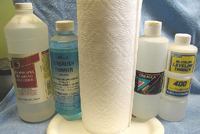
The Cheap Stuff:
Just like with tools needed to build the kit, there are some basic household items that you can get to help out in the painting department.
Sea Sponges: You can find these in most any supermarket. They are used basically for texture effects on bases and to get a marble effect on tombstones and coffins or the like. Just dab on the paint and dab off the excess.
Paper Plates: Who needs some fancy schmancy pallet to put your paint on or to mix colors? A coated paper plate will do the exact same thing for next to nothing in cost!
Paper Towels: Easiest thing to find around the house to clean brushes, remove excess paint for dry brushing, and clean up spills. Get the cheap no-name brand.
Paint Thinner/Brush Cleaner: Don’t waste your time and money on those expensive brands in the art supply stores. Get yourself a gallon jug of windshield wiper fluid from the grocery store for $1.29. Does the exact same thing! Run out of thinner while you’re at home modeling? Grab that bottle of rubbing alcohol you have stashed in the bathroom and make a 50/50 mix with tap water. Does the trick
|