- Supplies and Tools #1
- Supplies and Tools #2
- Primer and Brushes
- Paint
- Pastels, Sealers & Xtra Tips
|
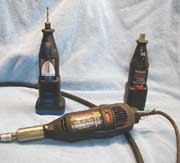
Dremel Moto Tool:
The Dremel tool is invaluable when it comes to building Garage Kits! This is without a doubt one of, if not the, most used tools for kit building. It will be one of the three most expensive items you will end up purchasing but should be well worth the money invested. The Dremel tool is a rotary power grinder. There are two models that we will focus on, the hand-held and the stand-up version. BOTH have a place in your stash of modeling supplies. The hand-held is battery operated and 2-speed. Most all of the Dremel attachments will fit this tool with varying degrees of results. For a first time user I highly recommend this model. Its ease of handling and use will really cut your work time in half building Garage Kits. The running price is roughly between $40.00 and $65.00. The higher priced one will come with an assortment of bits. It will also come with a battery charger. Do yourself a BIG favor! If you purchase this model, buy an extra battery! It’ll cost about $30.00, but you’ll thank me when, during a long modeling session, you find that the charge has run out of the battery you have and you won’t be able to get back to work until three hours later after it recharges! Buying the spare battery means you’ll always have a freshly charged battery on stand-by!
The stand-up Dremel Moto tool is the “Beast”! Its variable speed, has a wand attachment for easy handling, comes with a stowaway tool box and bit holder, will handle any and all bits and grinding/cutting wheels made, and runs on electricity so no worries about your battery dying. If you buy the deluxe model, you’re pretty much good to go for quite a long time. The deluxe model will run you about $140.00 – quite pricey.
The Dremel tool will be used for a great many applications in kit building. You can grind down areas to make the fit better, grind away offset mold lines, use a drill bit to pin mating parts (something we will touch on in a future article), cut away pour spouts, etch detail, buff metal parts . . . well, the list is endless! I have both types in my arsenal, and I’ll be perfectly honest with you: Both have their place and specific uses, but I do actually use my hand-held about 80% of the time. So start out with that one, and work your way up to the big boy.
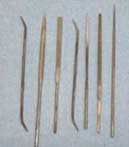
Jeweler’s Files:
There are not easy to find, but if you scour enough garage sales and flea markets, you’re bound to come across some. These files are small in size, come in an assortment of shapes and styles, and are very useful in cleaning parts that you can’t really get “into” using sandpaper and sanding files. They’re great for cleaning minor defects like resin boogers (warts) out of hard to access parts and are relatively inexpensive and useful tools. A set of these should run you under $8.00. Try and get the “regular” types. Rasp style is good but not for what we will be using them for.
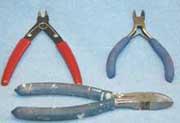
Wire Cutters/Nippy Cutters:
These cutters are used for cutting away sprues on resin Garage Kits and SHOULD be used when removing styrene parts from their “trees” on plastic kits. The are also used to cut pins you will need when pinning mating parts. Get the small sized wire cutter from Home Depot or your local hardware store and get the Nippy from Radio Shack. They shouldn’t cost more then $3.00-$4.00 each. I’d be lost without my Nippy Cutter!
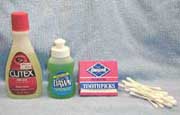
Nail Polish Remover:
Nail Polish Remover contains acetone, which is an active ingredient in “De-Bond.” If you get too much CA glue on a part or it drips and you don’t know it and need to remove it easily, just wipe on some nail polish remover and flake it off. It also works great if you get glue on your fingers. (Don’t laugh. I know a couple of guys who glued their fingers together and freaked out.) You can also use this if an area of a kit will not “take” primer and needs a good cleaning. Just wipe it on, and you should be good to go.
Tip:
Q-Tips or any generic name cotton swab will do. I use these in areas that I’ve puttied but can’t get my fat sausage fingers in to smooth out. Just dip the Q-Tip in water, and smooth the puttied area. These also work great when using modeling paste in highly detailed areas to clean out the excess putty. I use them when using pastels on kits and to make a textured finish in spots when painting.
Dishwashing Detergent is another necessary item. Garage Kits are made in silicone molds. You have to use a release agent to get the parts out of the molds. This leaves behind a residue on the parts, which will cause primer or paint to pretty much flake right off. The cure is to wash the parts in warm soapy water using a grease-fighting dishwashing liquid. Pretty easy, right? And it will make your hands kissably soft to boot!
Toothpicks are another must. I personally prefer the round ones. Their small size makes them great for resculpting small detail on puttied areas. They also help you clean out excess putty in detailed areas that you may have used too much putty on and are GREAT for painting eyes and pupils on the eyes.
Wire Clothes Hangers are the last thing you’ll need. Basically these are only used for making “pins” to pins parts together for added strength, but they are certainly cheaper than going out and buying a box of nails.
|